<?xml version="1.0" encoding="utf-8"?><feed xmlns="http://www.w3.org/2005/Atom" xml:lang="en"><generator uri="https://jekyllrb.com/" version="3.9.5">Jekyll</generator><link href="https://blog.papau.org/feed.xml" rel="self" type="application/atom+xml" /><link href="https://blog.papau.org/" rel="alternate" type="text/html" hreflang="en" /><updated>2024-07-16T21:49:58+00:00</updated><id>https://blog.papau.org/feed.xml</id><title type="html">papau.org blog</title><subtitle>My thoughts on tech and development. Some serious - some not. More not, I guess... </subtitle><author><name>Philipp Grathwohl</name></author><entry><title type="html">Building temperature and humidity sensors for OpenHab</title><link href="https://blog.papau.org/2020/01/19/building-temperature-and-humidity-sensors-for-openhab.html" rel="alternate" type="text/html" title="Building temperature and humidity sensors for OpenHab" /><published>2020-01-19T00:00:00+00:00</published><updated>2020-01-19T00:00:00+00:00</updated><id>https://blog.papau.org/2020/01/19/building-temperature-and-humidity-sensors-for-openhab</id><content type="html" xml:base="https://blog.papau.org/2020/01/19/building-temperature-and-humidity-sensors-for-openhab.html"><![CDATA[<p>Since the OpenHab instance that is running in my network has been quite empty for a long time I decided to give some home
made temperature and humidity sensors a shot. The goal was to have sensors that …</p>

<ul>
  <li>… send data wireless</li>
  <li>… do not require additional services (e.g. an mqtt broker or similar)</li>
  <li>… are cheap</li>
  <li>… are small enough to be casually placed in the rooms they operate in</li>
</ul>

<p>Bonus points for beeing able to run them on batteries.</p>

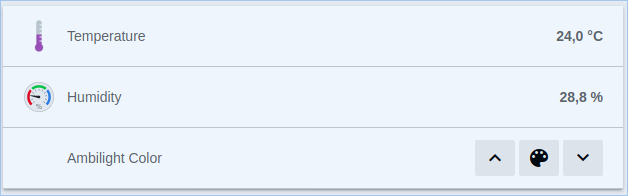
<figure class="image-center">
   <img src="/images/posts/2020-01-building-temperature-and-humidity-sensors-for-openhab/openhab_temperature_humidity.png" title="Temperature and humidity in OpenHab" alt="Temperature and humidity in OpenHab" />
   <figcaption>Temperature and humidity in OpenHab</figcaption>
</figure>

<h1 id="collecting-temperature-and-humidity-values">Collecting temperature and humidity values</h1>
<p>First of all I needed some way to measure temperature and get it somehow to my OpenHab instance. But with what hardware?
A raspberry pi seems to be a bit overqualified and energy hungry for just stupidly measuring temperature and sending it
somewere else.</p>

<p>I have little experience with microcontrollers but I like to browse through the <a href="https://hackaday.com" target="_blank">hackaday.com</a> for fun.
In some projects people used ESP8266 boards for their projects. Those sounded very interesting, because they are small, cheap and can connect
to wifi networks. That sounded pretty awesome so I wanted to try those.</p>

<p>I can’t remember where I heard about the BME280 sensor but those can measure temperature, humidity and pressure and work well with the ESP8266 boards.
You can also find a lot of other blogs that use them and explain how they can be used. I don’t use the pressure part right now, but who knows …</p>

<h2 id="esp8266--bme280">ESP8266 / BME280</h2>
<p>I ordered several a ESP8266 NodeMCU boards and the BME280 breakout boards. I used those (Amazon links):</p>
<ul>
  <li><a href="https://www.amazon.de/gp/product/B0754W6Z2F" target="_blank">ESP8266</a></li>
  <li><a href="https://www.amazon.de/gp/product/B07HMQMW6M" target="_blank">BME280</a></li>
</ul>

<p>I made the mistake when soldering together the first pair. And it’s really
annoying to unsolder them again. Especially if you don’t realize that it is soldered wrong at first. So here is a tip if you are just getting started
with microcontrollers and such: Use a breadboard first! It lets you try out the correct pins and connections before soldering. You can make sure
you connected everything correctly before proceeding. It’s much faster than soldering and thus much better for trying things in different ways.</p>

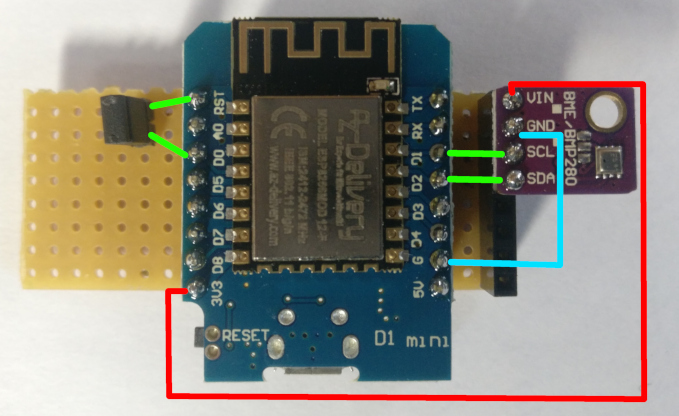
<figure class="image-center">
   <img src="/images/posts/2020-01-building-temperature-and-humidity-sensors-for-openhab/board_annotated_top.jpg" title="ESP8266 soldered with annotations top view" alt="ESP8266 soldered with annotations top view" />
   <figcaption>ESP8266 soldered with annotations top view</figcaption>
</figure>

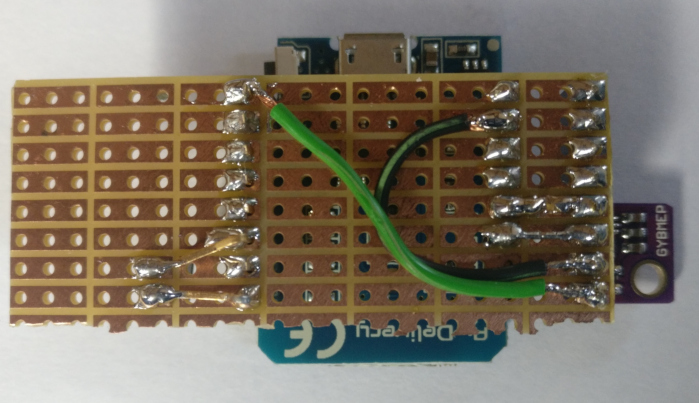
<figure class="image-center">
   <img src="/images/posts/2020-01-building-temperature-and-humidity-sensors-for-openhab/board_bottom.jpg" title="ESP8266 soldered bottom" alt="ESP8266 soldered bottom" />
   <figcaption>ESP8266 soldered bottom</figcaption>
</figure>

<p>For programming the board I used the ArduinoIDE. I also used a lot of info from this <a href="https://randomnerdtutorials.com/esp8266-bme280-arduino-ide/" target="_blank">blog post here</a> 
on how to connect the BME280 to the ESP8266 board and how to install the necessary extensions in the ArduinoIDE.</p>

<p>What’s different on my build is, the ESP8266 <em>does not</em> host a web service over which the sensor values can be quieried. This would require the sensor to
be <em>always on</em>. I didn’t want to do this because I wanted to save as much energy as possible to be able to run the sensors on batteries later.</p>

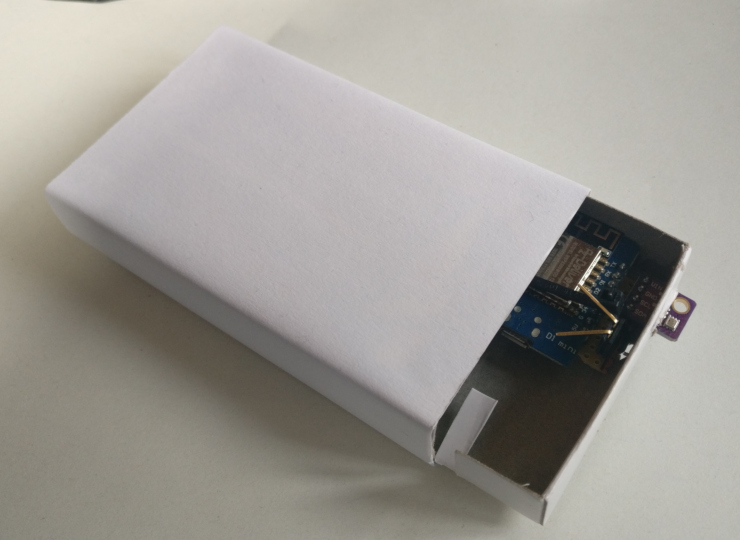
<p>Because I don’t have a 3D printer, I put the sensors in empty match boxes (big ones). There is also enough space for batteries in there.</p>

<figure class="image-center">
   <img src="/images/posts/2020-01-building-temperature-and-humidity-sensors-for-openhab/sensor_casing.jpg" title="Matchbox as sensor casing" alt="Matchbox as sensor casing" />
   <figcaption>Matchbox as sensor casing</figcaption>
</figure>

<figure class="image-center">
   <img src="/images/posts/2020-01-building-temperature-and-humidity-sensors-for-openhab/sensor_casing_closed.jpg" title="Matchbox as sensor casing closed" alt="Matchbox as sensor casing closed" />
   <figcaption>Matchbox as sensor casing closed</figcaption>
</figure>

<h2 id="sending-via-wifi">Sending via WiFi</h2>
<p>Because the sensors can not be queried they should send their collected data to the OpenHab service somehow. I tried to avoid an additional service 
such as an MQTT broker because it seemed a little oversized for my five sensors - at least for the moment.</p>

<p>OpenHab has a REST interface that let’s you manipulate the item states via HTTP requests. So this is a very easy way to update the soon to be created temperature
and humidity items. No need for any other component. How a request has to look like can be seen <a href="https://www.openhab.org/docs/configuration/restdocs.html" target="_blank">in the OpenHab documentation</a>.
More on that later.</p>

<p>Did you read that blog post I mentioned above? Good! Then you see that connecting to a Wifi network is aktually pretty easy.</p>

<h2 id="energy-saving">Energy saving</h2>
<p>One of the goals was to place those sensors somewhere in the room where they don’t get in the way. This is easily accomplished when they are 
run on batteries. But for this we need to write the software in another way. As mentioned above, running a web server on the ESP8266 and querying it
is possible, but costs a lot of energy. Most of it while nothing is measured and the values are not queried, but the webserver just waits for requests.</p>

<p>With my sensors I took another approach.</p>

<h3 id="deep-sleep">Deep sleep</h3>
<p>When trying to save energy the deep sleep mode is often mentioned for the ESP8266. This mode disables most of the boards features except for the RTC (i guess that
means Real Time Clock), which can in turn be used to wake up again from deep sleep. The energy consumption of the RTC is much lower than with the
other features (e.g. Wifi, System clock, CPU don’t know what else). The difference in programming is, that you never enter the typical <code class="language-plaintext highlighter-rouge">loop</code> method in your
program. The loop is done by going to sleep after the <code class="language-plaintext highlighter-rouge">setup</code> function is run. When waking up after the specified amount of time the <code class="language-plaintext highlighter-rouge">setup</code> function starts from the beginning.</p>

<div class="language-c highlighter-rouge"><div class="highlight"><pre class="highlight"><code><span class="kt">void</span> <span class="nf">setup</span><span class="p">()</span> <span class="p">{</span>
    <span class="c1">// This method is run at program start.</span>
    <span class="c1">// Program starts e.g. after you press the reset button</span>
    <span class="c1">// or the ESP8266 wakes up from deep sleep.</span>

    <span class="c1">// go to sleep for 30 seconds (or 30.000.000µs)</span>
    <span class="n">ESP</span><span class="p">.</span><span class="n">deepSleep</span><span class="p">(</span><span class="mi">30</span> <span class="o">*</span> <span class="mi">1000000</span><span class="p">);</span>

    <span class="c1">// code after the deepSleep method call is never reached</span>
<span class="p">}</span>

<span class="kt">void</span> <span class="nf">loop</span><span class="p">()</span> <span class="p">{</span>
    <span class="c1">// code in the loop method will never execute</span>
    <span class="c1">// if the deepSleep method is called in the</span>
    <span class="c1">// setup method.</span>
<span class="p">}</span>
</code></pre></div></div>
<p>An important thing to note is, that the ESP8266 won’t wake up after the specified time if the <code class="language-plaintext highlighter-rouge">RST</code> pin is not connected to the <code class="language-plaintext highlighter-rouge">D0</code> pin. So make sure you do that
so the program works. I had an issue with uploading my sketch to the ESP when this connection was already made while uploading. So I soldered this to jumper pins
so I can remove the connection while programming.</p>

<p>A lot more detailed information about deep sleep can be found in <a href="https://randomnerdtutorials.com/esp8266-deep-sleep-with-arduino-ide/" target="_blank">this blog post</a>.</p>

<h3 id="wifi-reconnect">Wifi reconnect</h3>
<p>Going to deep sleep and waking up again requires a reconnect to the Wifi in each iteration. This takes quite a while because a network scan is performed to find the
appropriate channel on which the wifi is sending. Also getting an IP address via DHCP takes really long. The latter duration can be dramatically reduced by using a fixed
IP address. But I don’t want to specify a fixed IP for all sensors in the firmware because this is so unflexible.</p>

<p>The problem with scanning for the channel can also be mitigated by remembering the channel when sucessfully connecting for the first time.
<a href="https://www.bakke.online/index.php/2017/06/24/esp8266-wifi-power-reduction-avoiding-network-scan/" target="_blank">This blog post</a>
is an excellent resource on how to do that.</p>

<h3 id="dhcp-cache">DHCP cache</h3>
<p>The problem with the DHCP still remains. So I extended the solution of the wifi channel and bssid saving and added the IP address, netmask and gateway after retrieving
a DHCP lease for the first time. Note that this is not really a valid DHCP client implementation because it does not take the actual lease time into account. But it works
fine and reduces the total time for one cycle of waking up, measuring, connecting to wifi and sending the data from about 16 seconds down to 4. That should save some energy.</p>

<div class="language-c highlighter-rouge"><div class="highlight"><pre class="highlight"><code><span class="k">struct</span> <span class="p">{</span>
  <span class="kt">uint32_t</span> <span class="n">crc32</span><span class="p">;</span>
  <span class="kt">uint8_t</span> <span class="n">channel</span><span class="p">;</span>
  <span class="kt">uint8_t</span> <span class="n">bssid</span><span class="p">[</span><span class="mi">6</span><span class="p">];</span>
  <span class="kt">uint8_t</span> <span class="n">padding</span><span class="p">;</span> <span class="c1">// everything to here is from the original blog post</span>
  <span class="kt">uint32_t</span> <span class="n">ip</span><span class="p">;</span>    <span class="c1">// ip, netmask and gateway were added by me</span>
  <span class="kt">uint32_t</span> <span class="n">netmask</span><span class="p">;</span>
  <span class="kt">uint32_t</span> <span class="n">gateway</span><span class="p">;</span>
<span class="p">}</span> <span class="n">rtcData</span><span class="p">;</span>
</code></pre></div></div>
<h3 id="savings">Savings</h3>
<p>All those things are done to reduce the energy consumption. But I can’t really prove that it is really saving much. I don’t have the equipment nor the ability to measure
how long my batteries will last - but a reduction from 16 to 4 seconds shouldn’t be too bad.</p>

<h1 id="openhab-items">OpenHab items</h1>
<p>Because I want to use the same firmware for all sensors without modifying it. I need some identifier for the sensor when it sends the data to OpenHab. For this identifier I
chose the MAC address. The items for the sensors values in OpenHab are following the naming conventiones I adopted from the OpenHab documentation. So they can be
easily identified throughout the system. What that means is, that they do not include a MAC address in their name. They are named
something like <code class="language-plaintext highlighter-rouge">GF_LivingRoom_Temperature</code>.</p>

<p>So how can I update those items without adapting the firmware of each sensor?</p>

<h2 id="mapping-mac-addresses-to-acutal-items">Mapping MAC addresses to acutal items</h2>
<p>The answer is, there must be some kind of mapping. I need to map the MAC address of the sensor to an actual item in OpenHab.
The idea is to have an OpenHab item that corresponds to the MAC address of the sensor. This helper-item is then used to update the specific temperature or humidity item.</p>

<p>First thing I did was to create a group that contains all items that are only used to map values to another item. Why this
is necessary you will see later. Then I created an item that has the MAC address in its name so it can be updated
by the sensor over the OpenHab REST interface. In the items label I set the name of another OpenHab item - the one that should
actually hold the value. So this establishes the mapping between MAC address and item that should be updated in OpneHab.</p>

<p>See the sample OpenHab items configuration file below.</p>
<div class="language-plaintext highlighter-rouge"><div class="highlight"><pre class="highlight"><code>// group that contains mapping items
gSensorMapping

// create item that maps the MAC address to the actual item.
// Note that this item has the gSensorMapping group assigned
Number  temperatureAABBCC112233	"GF_LivingRoom_Temperature"    (gSensorMapping)

// create the actual temperature item that should be used for everything within OpenHab
Number	GF_LivingRoom_Temperature	"Temperature [%.1f °C]"	&lt;temperature&gt;	(GF_LivingRoom)
</code></pre></div></div>

<p>After that, the mapping item (the first one) can be easily updated by the sensor using the REST interface and the
sensors MAC address. This works without modifying the firmware for each sensor. The MAC address is just included
in the REST url as the name of the item so the requested url looks something like this:</p>
<div class="language-plaintext highlighter-rouge"><div class="highlight"><pre class="highlight"><code>https://openhabserver.baseaddress.com/rest/items/temperature + MAC_ADDRESS
</code></pre></div></div>

<p>This updates the mapping item, but not the acutal temperature item we want to use. To achieve this I wrote
a small OpenHab rule that uses the mapping information to transfer the sent values. Here the
group that was created earlier is used.</p>

<p>The rule listens on updates of mapping items - the ones that are part of the <code class="language-plaintext highlighter-rouge">gSensorMapping</code> group - and forwards the value to
the item that is referenced in the label of the mapping item.</p>

<div class="language-plaintext highlighter-rouge"><div class="highlight"><pre class="highlight"><code>rule "Forward updates of raw sensors to the appropriate high level sensor"
when
	Member of gSensorMapping received update
then
	logInfo("Map Sensor", "Mapping sensor '" + triggeringItem.name + "' to '" + trig
geringItem.label + "'")
	var targetItemName = triggeringItem.label
	postUpdate(targetItemName, triggeringItem.state.toString)
end
</code></pre></div></div>
<p>The good thing is, that the rule is only necessary once. More mappings can easily be defined by adding a mapping item and
a regular item that is used in OpenHab as usual.</p>

<h2 id="check-sensors-sending-data">Check sensors sending data</h2>
<p>I plan to run the sensors on battery, but they don’t report their battery charge condition (yet). To make sure they are
running I let openhab check if the sensors send data in regular intervals. If they don’t, I send a warning notification to check on the affected sensor.</p>

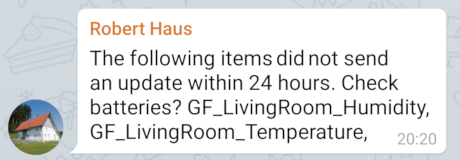
<figure class="image-float-right">
   <img src="/images/posts/2020-01-building-temperature-and-humidity-sensors-for-openhab/notification.png" title="Telegram notification for missing update of sensor" alt="Telegram notification for missing update of sensor" />
   <figcaption>Telegram notification for missing update of sensor</figcaption>
</figure>

<p>Similar to the sensor mapping, for this I created a new group that will be applied to all items that expect
regular updates. Then a rule is created that checks if those items were updated in time. In my case I only check
this during the day to avoid notifications in the middle of the night. Also my notifications are sent via telegram
but other channels would be possible depending on your OpenHab configuration.</p>

<div class="language-plaintext highlighter-rouge"><div class="highlight"><pre class="highlight"><code>Group gWatchdogWarning24h

// Assign the above group to all items that should be checked for regular updates
// in my case e.g. the temperature and humidity items
Number	GF_LivingRoom_Temperature	"Temperature [%.1f °C]"	&lt;temperature&gt;	(gWatchdogWarning24h, persist_on_update, GF_LivingRoom)
</code></pre></div></div>
<p>The temperature item has the gWatchdogWarning24h assigned so it will be checked by the following rule. The persist_on_update group
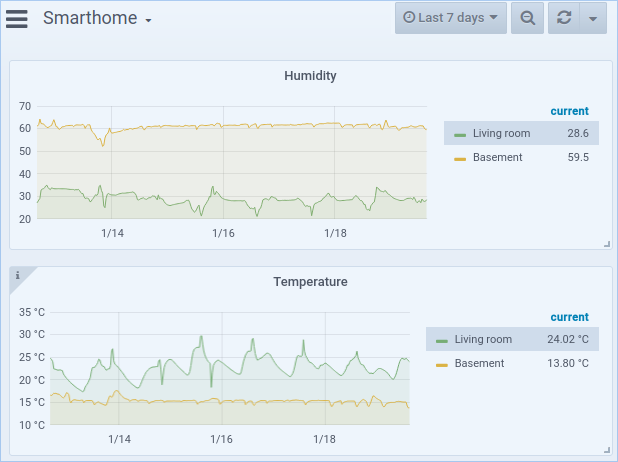
is used persist the items values in an influx database. It is necessary to persist the items values in some datastore, otherwise
the check for the last update is not possible. Additional advantage is, that you can create nice graphs via grafana.</p>

<figure class="image-center">
   <img src="/images/posts/2020-01-building-temperature-and-humidity-sensors-for-openhab/grafana_temperature_trend.png" title="Grafana temperature and humidity trend reports" alt="Grafana temperature and humidity trend reports" />
   <figcaption>Grafana temperature and humidity trend reports</figcaption>
</figure>

<p>The rule that checks the updates:</p>
<div class="language-plaintext highlighter-rouge"><div class="highlight"><pre class="highlight"><code>rule "Send warning if item has not been updated in the last 24h"
when
	Time cron "0 0 8-20/5 1/1 * ? *"
then
	logInfo("watchdogRules", "Checking items that require status updates every 24h")
	var itemsThatNeedUpdates = ""

	gWatchdogWarning24h?.allMembers.forEach [ item |
		logInfo("watchdogRules", "Checking item: " + item.name)

		var rawLastUpdate = item.lastUpdate
		if (rawLastUpdate !== null)
		{
			var lastUpdate = rawLastUpdate.toInstant().toDateTime()
			if (lastUpdate.plusHours(24).isBefore(now))
			{
				itemsThatNeedUpdates += item.name + ", "
			}
		}
		else {
			logInfo("watchdogRules", "Does not seem to have received an update ever")
			itemsThatNeedUpdates += item.name + ", "
		}
	]

	if (itemsThatNeedUpdates == "")	{
		logInfo("watchdogRules", "All items seem to be up to date")
	}
	else {
		logInfo("watchdogRules", "The following items did not send an update in time: " + itemsThatNeedUpdates)
		sendTelegram("openhab_bot_name", "The following items did not send an update within 24 hours. Check batteries? " + itemsThatNeedUpdates)
	}
end
</code></pre></div></div>

<h1 id="conclusion">Conclusion</h1>
<p>The self made sensors work quite well and the grafs look quite nicely. I don’t now how long the batteries will last but I did my best to reduce
the energy consumption. This was my first step toward a smarter home.</p>

<p>The source code for the sensors can be found in my <a href="https://github.com/papauorg/SmarthomeSensorFirmware" target="_blank">github repository</a> in case you are interested.</p>]]></content><author><name>Philipp Grathwohl</name></author><category term="smarthome" /><category term="OpenHab" /><category term="ESP8266" /><category term="WiFi" /><category term="deep-sleep" /><summary type="html"><![CDATA[Building temperature and humidity sensors that use cheap hardware and integrate nicely in OpenHab.]]></summary><media:thumbnail xmlns:media="http://search.yahoo.com/mrss/" url="https://blog.papau.org/images/papauorg_logo.png" /><media:content medium="image" url="https://blog.papau.org/images/papauorg_logo.png" xmlns:media="http://search.yahoo.com/mrss/" /></entry><entry><title type="html">Docker behind authenticating proxy</title><link href="https://blog.papau.org/2019/11/19/docker-behind-proxy.html" rel="alternate" type="text/html" title="Docker behind authenticating proxy" /><published>2019-11-19T00:00:00+00:00</published><updated>2019-11-19T00:00:00+00:00</updated><id>https://blog.papau.org/2019/11/19/docker-behind-proxy</id><content type="html" xml:base="https://blog.papau.org/2019/11/19/docker-behind-proxy.html"><![CDATA[<p>I have been trying to pull docker images to my work machine for a long time now. It’s such a pain because our desktops do not have direct internet access. Instead we need to use a proxy that requires authentication.</p>

<p>In docker for windows you can easily set a proxy. The problem is, if you want to use a proxy with authentication you need to specify the proxy with your domain user and the password, like so:</p>
<div class="language-plaintext highlighter-rouge"><div class="highlight"><pre class="highlight"><code>http://USER:PASSWORD@our-corporate-proxy:8080
</code></pre></div></div>
<p>The user and password are set in clear text which I’m not so comfortable with. I didn’t investigate if it’s possible in windows, too, but when running docker on a linux machine, you can set the proxy via environment variables … in which I also don’t want to set my password in clear text.</p>

<h1 id="cntlm">CNTLM</h1>
<p>I’m not aware of a way to get around the above mentioned problem without any additional tool. After a little online search I found the cntlm tool. In short it’s a proxy that handles the communication and authentication with an upstream proxy so your tools won’t have to.</p>

<p>To be able to authenticate to the upstream proxy you also need to specify the credentials. Other than in the proxy url you can at least specify an NTLM hash and not a clear text password.</p>

<h2 id="configuration">Configuration</h2>
<p>After installing cntlm (in my case via <code class="language-plaintext highlighter-rouge">choco install cntlm</code>) it can be configured with the <code class="language-plaintext highlighter-rouge">cntlm.ini</code> file in the installation directory. First we need to create the hash that should go to the configuration file. This can be done with the following command in a cmd or powershell.</p>
<div class="language-powershell highlighter-rouge"><div class="highlight"><pre class="highlight"><code><span class="n">cntlm.exe</span><span class="w"> </span><span class="nt">-H</span><span class="w"> </span><span class="nt">-u</span><span class="w"> </span><span class="nx">DOMAINUSER</span><span class="w"> </span><span class="nt">-d</span><span class="w"> </span><span class="nx">DOMAIN</span><span class="w">
</span></code></pre></div></div>
<p>This will prompt you for your password and will then print the NTLM hash you need for configuration.</p>

<div class="language-plaintext highlighter-rouge"><div class="highlight"><pre class="highlight"><code>PassLM      XXXXX
PassNT      XXXXX
PassNTLMv2  XXXXX
</code></pre></div></div>
<p>In my case I just needed the last one. So I copied that one and put it in the <code class="language-plaintext highlighter-rouge">cntlm.ini</code> configuration file at the appropriate location (where the samples are commented). Don’t forget to change the user and domain settings. Also make sure the <code class="language-plaintext highlighter-rouge">Auth   NTLMv2</code> is set. It will look something like this at the beginning of the file:</p>
<pre><code class="language-cntlm.ini">#
# Cntlm Authentication Proxy Configuration
#
# NOTE: all values are parsed literally, do NOT escape spaces,
# do not quote. Use 0600 perms if you use plaintext password.
#

Username	YOUR_USERNAME
Domain		YOUR_DOMAIN.com

# NOTE: Use plaintext password only at your own risk
# Use hashes instead. You can use a "cntlm -M" and "cntlm -H"
# command sequence to get the right config for your environment.
# See cntlm man page
# Example secure config shown below.
Auth            NTLMv2
PassNTLMv2      XXXXXXXXXX
</code></pre>
<p>Save the file and check if it works:</p>

<div class="language-powershell highlighter-rouge"><div class="highlight"><pre class="highlight"><code><span class="n">cntlm.exe</span><span class="w"> </span><span class="nt">-M</span><span class="w"> </span><span class="nx">http://google.com</span><span class="w">
</span></code></pre></div></div>
<p>If everything is ok it should print something like</p>
<div class="language-plaintext highlighter-rouge"><div class="highlight"><pre class="highlight"><code>Config profile  1/4... OK (HTTP code: 301)
----------------------------[ Profile  0 ]------
Auth            NTLMv2
PassNTLMv2      XXXXXXXXX
------------------------------------------------
</code></pre></div></div>
<h1 id="docker">Docker</h1>
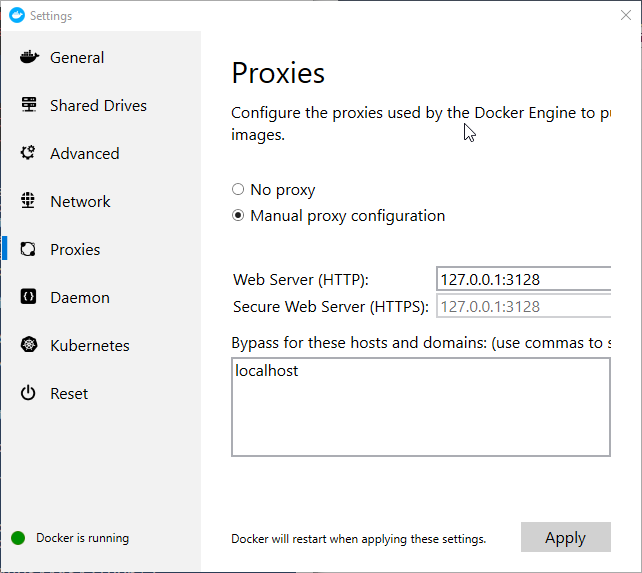
<p>If you start the cntlm windows service you can now use that proxy via <code class="language-plaintext highlighter-rouge">localhost:3128</code>. In docker for windows you can set it via the UI.</p>

<figure class="">
   <img src="/images/posts/2019-11-docker-behind-authenticating-proxy/docker_proxy_settings.png" title="Setting proxy in docker UI" alt="Setting proxy in docker UI" />
   <figcaption>Setting proxy in docker UI</figcaption>
</figure>

<p>Unfortunately after setting this proxy and running e.g. <code class="language-plaintext highlighter-rouge">docker search grafana</code> I always received the following error.</p>
<blockquote cite="docker error message">
Error response from daemon: Get https://index.docker.io/v1/search?q=grafana&amp;n=25: proxyconnect tcp: dial tcp 10.0.75.1:3128: i/o timeout
</blockquote>

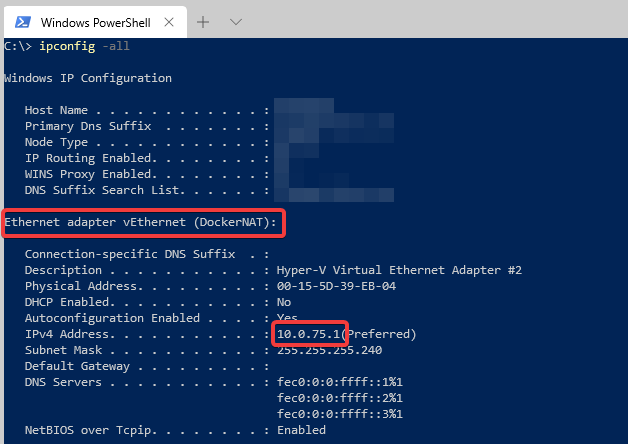
<p>Hm, strange. Why does docker try to use <code class="language-plaintext highlighter-rouge">10.0.75.1:3128</code> instead of the localhost that I actually specified in the settings? Well I think this is because when using docker for windows, the docker host is actually hosted in a virtual machine - which is running on localhost, but it’s not the same as localhost. It’s in its own network and has its own IP address. Which can also be seen when doing an <code class="language-plaintext highlighter-rouge">ipconfig -all</code>.</p>

<figure class="">
   <img src="/images/posts/2019-11-docker-behind-authenticating-proxy/ipconfig.png" title="ipconfig showing docker NAT ethernet adapter with ip 10.0.75.1" alt="ipconfig showing docker NAT ethernet adapter with ip 10.0.75.1" />
   <figcaption>ipconfig showing docker NAT ethernet adapter with ip 10.0.75.1</figcaption>
</figure>

<h2 id="troubleshooting">Troubleshooting</h2>
<p>So it seems, that cntlm does not accept connections from other machines, which is a good thing from the security perspective. So the internet connection that uses your credentials can at least only be used from your own machine. But unfortunately docker can’t use it. The solution for this is to set the <code class="language-plaintext highlighter-rouge">Gateway</code> configuration in the <code class="language-plaintext highlighter-rouge">cntlm.ini</code> file to <code class="language-plaintext highlighter-rouge">yes</code>. This allows other machines to use the proxy.</p>

<div class="language-plaintext highlighter-rouge"><div class="highlight"><pre class="highlight"><code># Enable to allow access from other computers
#
Gateway	yes
</code></pre></div></div>

<p>To improve security I used the windows firewall and restricted inbound connections to CNTLM (Port 3128) to specifically allow the IPs of the docker NAT (in my case 10.0.75.1-10.0.75.15). So that are the only IPs that can use the proxy. You can also specify allowed IPs in the <code class="language-plaintext highlighter-rouge">cntlm.ini</code> file but that didn’t have any effect when I tried that. I probably did something wrong there. But it works fine with the firewall rules. Additionally I stop cntlm when I’m not actively using it to further reduce the possibility of misuse of this proxy.</p>

<h1 id="finally-working">Finally working</h1>
<p>After all those changes (and restarting the cntlm service) I can finally search and pull docker images from the docker registry. What a fight …</p>

<figure class="">
   <img src="/images/posts/2019-11-docker-behind-authenticating-proxy/docker_search_grafana.png" title="working docker search command" alt="working docker search command" />
   <figcaption>working docker search command</figcaption>
</figure>]]></content><author><name>Philipp Grathwohl</name></author><category term="docker" /><category term="network" /><category term="proxy" /><category term="windows" /><summary type="html"><![CDATA[Pull docker images when running behind a corporate authenticating proxy with docker for windows.]]></summary><media:thumbnail xmlns:media="http://search.yahoo.com/mrss/" url="https://blog.papau.org/images/papauorg_logo.png" /><media:content medium="image" url="https://blog.papau.org/images/papauorg_logo.png" xmlns:media="http://search.yahoo.com/mrss/" /></entry><entry><title type="html">Everyday git commands</title><link href="https://blog.papau.org/2019/02/06/everyday-git-commands.html" rel="alternate" type="text/html" title="Everyday git commands" /><published>2019-02-06T00:00:00+00:00</published><updated>2019-02-06T00:00:00+00:00</updated><id>https://blog.papau.org/2019/02/06/everyday-git-commands</id><content type="html" xml:base="https://blog.papau.org/2019/02/06/everyday-git-commands.html"><![CDATA[<p>As a software developer I use git as my version control system almost every day. I really like git and its flexibility. Here I want to share my git aliases and the commands I use every day.</p>

<p>I like to use the command line a lot, as it gives you a lot of flexibility and a better understanding in what’s happening compared to some GUIs. So the main work with git is done in the console. There
are a few exeptions. I am using a GUI merge tool for example. But most of the time I’m working with git in the command line.</p>

<p>To make things easier I use quite a few aliases. Some of which are commonly known and used by fellow devs. But maybe here are some that you didn’t know, yet.</p>

<h2 id="git-checkout">git checkout</h2>
<p>The alias I use for the checkout command is <code class="language-plaintext highlighter-rouge">co</code>. It is very simple and commonly used by many people. The nice thing is, this one alias
already gives a lot of benefits. Create it using:</p>
<div class="language-bash highlighter-rouge"><div class="highlight"><pre class="highlight"><code>git config <span class="nt">--global</span> alias.co checkout
</code></pre></div></div>

<h3 id="create-a-branch">Create a branch</h3>
<p>Usually the first time I can use this new alias is to create a new branch before starting to code. For example to create a new feature branch.
<code class="language-plaintext highlighter-rouge">git co -b feature/some-feature</code>
Note the <code class="language-plaintext highlighter-rouge">-b</code> switch which allows you to switch to a branch that gets created in the process. Short for <code class="language-plaintext highlighter-rouge">git branch feature/some-feature</code> and <code class="language-plaintext highlighter-rouge">git checkout feature/some-feature</code>.</p>

<h3 id="undo-changes">Undo changes</h3>
<p>Next is to undo changes on tracked files</p>
<div class="language-bash highlighter-rouge"><div class="highlight"><pre class="highlight"><code>git co <span class="nt">--</span> <span class="nb">.</span>
</code></pre></div></div>

<h3 id="switch-branches">Switch branches</h3>
<p>What I really like is this little gem:</p>
<div class="language-bash highlighter-rouge"><div class="highlight"><pre class="highlight"><code>git co -
</code></pre></div></div>
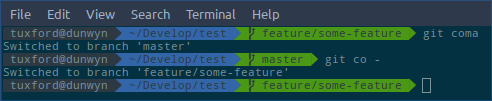
<p>The <code class="language-plaintext highlighter-rouge">-</code> switches back to the previous branch. It’s the <code class="language-plaintext highlighter-rouge">Alt</code>+<code class="language-plaintext highlighter-rouge">Tab</code> of branches.</p>

<p>Additionally I created the <code class="language-plaintext highlighter-rouge">coma</code> alias for directly switching to the master branch regardless of where I was before.</p>
<div class="language-bash highlighter-rouge"><div class="highlight"><pre class="highlight"><code>git config <span class="nt">--global</span> alias.coma <span class="s1">'checkout master'</span>
</code></pre></div></div>

<figure class="image-center">
   <img src="/images/posts/2019-02-everyday-git-commands/git_checkout_shortcuts.png" title="git checkout shortcuts" alt="git checkout shortcuts" />
   <figcaption>git checkout shortcuts</figcaption>
</figure>

<h2 id="git-add">git add</h2>
<p>I like to check the changes I made before adding them to the staging area. When I did that by using a gui tool I was annoyed by opening the compare tool, reviewing the
changes, closing the compare tool and then adding the file to the staging area. It’s just too many steps and usually I have to switch to the mouse.</p>

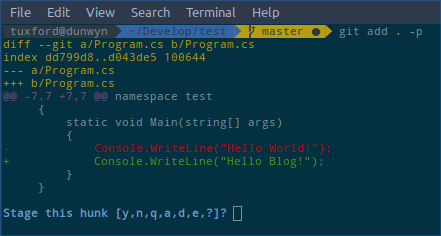
<p>As an alternative there is this fine command:
<code class="language-plaintext highlighter-rouge">git add . -p</code></p>

<figure class="image-float-right">
   <img src="/images/posts/2019-02-everyday-git-commands/git_add_patch.png" title="git add patches" alt="git add patches" />
   <figcaption>git add patches</figcaption>
</figure>

<p>The <code class="language-plaintext highlighter-rouge">-p</code> switch causes the add command to split up changes in the files into small hunks, that can be reviewed and accepted or rejected individually in the command line.
It asks for each hunk what it should do with it and you can choose if you want it in your commit by simply using the <code class="language-plaintext highlighter-rouge">y</code> or <code class="language-plaintext highlighter-rouge">n</code> key. There are some more options, but those
are the ones that are most relevant to me.</p>

<p>Especially for a lot of small changes in many files this is a lot faster than opening every file and adding it to the statging area. An additional advantage is of course
that you can add only parts of a file to the next commit.</p>

<p>See  <a href="https://git-scm.com/docs/git-add" target="_blank">git add documentation</a> for more details.</p>

<h2 id="git-rebase">git rebase</h2>
<p>I like clean history, that is why I do a rebase on my feature branches before creating my pull requests. Often the branch I rebase against is the
master branch. I created a <code class="language-plaintext highlighter-rouge">rema</code> alias, that switches to the master branch, pulls the latest commits, switches back to the previous branch and then
executes a rebase onto the master branch.</p>
<div class="language-bash highlighter-rouge"><div class="highlight"><pre class="highlight"><code>git config <span class="nt">--global</span> alias.rema <span class="o">!</span><span class="s1">'git checkout master &amp;&amp; git pull &amp;&amp; git co - &amp;&amp; git rebase master'</span>
</code></pre></div></div>
<p>The git aliases that start with a ! are treated like shell commands. The above command runs under my linux system. If you want to be able
to use it with powershell, you might have to replace the <code class="language-plaintext highlighter-rouge">&amp;&amp;</code> with a <code class="language-plaintext highlighter-rouge">;</code>.</p>

<p>Sometimes it is necessary to resolve conflicts. For this I use the <code class="language-plaintext highlighter-rouge">git mergetool</code> command or the alias <code class="language-plaintext highlighter-rouge">mt</code>.</p>
<div class="language-bash highlighter-rouge"><div class="highlight"><pre class="highlight"><code>git config <span class="nt">--global</span> alias.mt mergetool
</code></pre></div></div>

<p>When a merge is successful the <code class="language-plaintext highlighter-rouge">git rebase --continue</code> comes to play. The rebase creates *.orig files per default. To remove them and continue
the rebase I have an alias <code class="language-plaintext highlighter-rouge">rc</code>. I know that the creation of the orig files can be surpressed, but they are quite handy sometimes. So I still
want them created but removed if I continue the rebase.</p>
<div class="language-bash highlighter-rouge"><div class="highlight"><pre class="highlight"><code>git config <span class="nt">--global</span> alias.rc <span class="o">!</span><span class="s1">'git clean -f &amp;&amp; git rebase --continue'</span>
</code></pre></div></div>
<p>Again, use <code class="language-plaintext highlighter-rouge">;</code> instead of <code class="language-plaintext highlighter-rouge">&amp;&amp;</code> on windows.</p>

<h2 id="git-push">git push</h2>
<p>When the feature is finished or ready to be reviewed it must be published to the remote repository.
The command</p>
<div class="language-bash highlighter-rouge"><div class="highlight"><pre class="highlight"><code>git push <span class="nt">--set-upstream</span> origin feature/branch-name
</code></pre></div></div>
<p>can be used for that, but is quite verbose. I don’t want to type that much. So I use an alias <code class="language-plaintext highlighter-rouge">pu</code>:</p>
<div class="language-bash highlighter-rouge"><div class="highlight"><pre class="highlight"><code>git config <span class="nt">--global</span> alias.pu <span class="o">!</span><span class="s1">'git push --set-upstream origin $(git rev-parse --abbrev-ref HEAD)'</span>
</code></pre></div></div>

<h3 id="open-webui-for-creating-pullrequests-linux-only">Open WebUI for creating pullrequests (Linux only)</h3>
<p>The next step for me is usually to switch to the web view and create a pull request for my newly published branch.
To speed up this process a little bit, I use an alias <code class="language-plaintext highlighter-rouge">pr</code>. It reads the URL from the origin remote and builds
the URL to the <code class="language-plaintext highlighter-rouge">Create pull request</code> view of my provider. Because I don’t want to install additional tools I tried
to solve this only with git aliases and configs. That is why this step may seem a little complicated. Additionally it
only works with a linux bash because the aliases use e.g. <code class="language-plaintext highlighter-rouge">sed</code>.</p>

<p>The steps required are:</p>
<ol>
  <li>Get the remote URL</li>
  <li>Try to resolve ssh URLs to https URLs</li>
  <li>Append the path for the pull request creation view to this URL</li>
  <li>Replace the $branch and $base placeholders in the URL templates with the actual branch names</li>
  <li>Open the URL with the systems default browser</li>
</ol>

<h3 id="step-1--2">step 1 &amp; 2</h3>
<div class="language-bash highlighter-rouge"><div class="highlight"><pre class="highlight"><code>git config <span class="nt">--global</span> alias.getbaseurl <span class="o">!</span><span class="s1">'git remote get-url origin | sed -r "s/git@(.+?):(.+?)\\.git/https\\/\\/\1\\/\\2/"'</span>
</code></pre></div></div>

<h3 id="step-3">step 3</h3>
<p>To provide paths for different providers, in my case github and gitlab. I created config entries per provider and a <code class="language-plaintext highlighter-rouge">default</code>
which can be set globally and overwritten per repository if needed.</p>

<p>The URLs may contain placeholders. Those will get replaced. <code class="language-plaintext highlighter-rouge">$base</code> will be replaced with <code class="language-plaintext highlighter-rouge">master</code> and <code class="language-plaintext highlighter-rouge">$branch</code> with the currently checked out branch name.</p>

<div class="language-bash highlighter-rouge"><div class="highlight"><pre class="highlight"><code>git config <span class="nt">--global</span> pullrequesturls.github <span class="s1">'/compare/$base...$branch?expand=1'</span>
git config <span class="nt">--global</span> pullrequesturls.gitlab <span class="s1">'/merge_requests/new?merge_request[source_branch]=$branch&amp;merge_request[target_branch]=$base'</span>
git config <span class="nt">--global</span> pullrequesturls.default pullrequesturls.github
</code></pre></div></div>
<p>The default is the used in combination with the command that gets the base URL from step 1.</p>
<div class="language-bash highlighter-rouge"><div class="highlight"><pre class="highlight"><code>git config <span class="nt">--global</span> alias.getpullrequesturl <span class="o">!</span><span class="s1">'echo "$(git getbaseurl)$(git config $(git config pullrequesturls.default))"'</span>
</code></pre></div></div>

<h3 id="step-4">step 4</h3>
<p>Here it gets tricky. We will need to replace the <code class="language-plaintext highlighter-rouge">$branch</code> and <code class="language-plaintext highlighter-rouge">$base</code> placeholders. Calling sed with variables is doable, but
I found myself in quote escaping hell while trying to create the alias command for it. So please just insert this line manually
in your git config file and please don’t be mad at me.</p>

<div class="language-ini highlighter-rouge"><div class="highlight"><pre class="highlight"><code><span class="nn">[alias]</span>
    <span class="py">replacebranches</span> <span class="p">=</span> <span class="s">!git getpullrequesturl | sed 's,$branch,'</span><span class="se">\"</span><span class="s">$(git rev-parse --abbrev-ref HEAD)</span><span class="se">\"</span><span class="s">'', | sed 's,$base,master,'</span>
</code></pre></div></div>

<h3 id="step-5">step 5</h3>
<p>Put it all together and create a nice short <code class="language-plaintext highlighter-rouge">pr</code> alias. <code class="language-plaintext highlighter-rouge">sensible-browser</code> uses the systems default browser to open the URL.</p>
<div class="language-bash highlighter-rouge"><div class="highlight"><pre class="highlight"><code>git config <span class="nt">--global</span> alias.pr <span class="o">!</span><span class="s1">'sensible-browser $(git replacebranches)'</span>
</code></pre></div></div>

<h2 id="dotfiles">dotfiles</h2>
<p>There are a lot more aliases that I have configured and that I use from time to time. The above ones are especially noteworthy in my opinion.
You can have a look at my <a href="https://github.com/papauorg/dotphiles/blob/master/git/gitconfig" target="_blank">dotfiles</a> if you want to view the other aliases and configs that I have.</p>

<p>By the way if you are a linux user you should have a look at dotfiles in general because it is really awesome to have your config files in a git repository.</p>]]></content><author><name>Philipp Grathwohl</name></author><category term="git" /><category term="development" /><category term="commandline" /><category term="cli" /><summary type="html"><![CDATA[Some of my most used git commands and useful aliases for every day use.]]></summary><media:thumbnail xmlns:media="http://search.yahoo.com/mrss/" url="https://blog.papau.org/images/papauorg_logo.png" /><media:content medium="image" url="https://blog.papau.org/images/papauorg_logo.png" xmlns:media="http://search.yahoo.com/mrss/" /></entry><entry><title type="html">Renew your builds - A piece of cake</title><link href="https://blog.papau.org/2017/10/25/renew-your-builds.html" rel="alternate" type="text/html" title="Renew your builds - A piece of cake" /><published>2017-10-25T00:00:00+00:00</published><updated>2017-10-25T00:00:00+00:00</updated><id>https://blog.papau.org/2017/10/25/renew-your-builds</id><content type="html" xml:base="https://blog.papau.org/2017/10/25/renew-your-builds.html"><![CDATA[<p>At the beginning of the year we moved our SVN repository to git and introduced
the <strong>T</strong>eam <strong>F</strong>oundation <strong>S</strong>erver to our development team. After the switch
we planned our next steps and decided that we wanted to try the TFS build system. Doing that we wanted to give the Cake build system a try.</p>

<blockquote cite="https://cakebuild.net/">
Cake (C# Make) is a cross platform build automation system with a C# DSL to do things like compiling code, copy files/folders, running unit tests, compress files and build NuGet packages.
</blockquote>

<p>Let me sketch out our situation a little bit and how we integrated Cake.</p>

<h1 id="xmhell">XMHell</h1>
<p>Did I spell that correctly? My bad! But seriously, is there anyone who actually likes editing XML files by hand? I refuse to believe that. Our current build files are MsBuild XML files that define what’s part of the build process. Some of them more complex than others. Especially if you call some external tools that need escaping of characters that are used by XML then you end up with stuff like</p>
<div class="language-xml highlighter-rouge"><div class="highlight"><pre class="highlight"><code><span class="nt">&lt;SomeElement</span> <span class="na">attribute=</span><span class="s">"&amp;quot;&amp;amp;canyoustillreadthis?&amp;quot;"</span><span class="nt">&gt;</span>
</code></pre></div></div>
<p>Do I have to say more?</p>

<p>With Cake you can write nice and clean C# syntax, use methods and classes to structure your code and use the .NET Framework classes 
and helpers. On top of that Cake offers many extensions that help with managing tasks, arguments or tools. See this minimal example from the Cake homepage:</p>

<div class="language-csharp highlighter-rouge"><div class="highlight"><pre class="highlight"><code><span class="kt">var</span> <span class="n">target</span> <span class="p">=</span> <span class="nf">Argument</span><span class="p">(</span><span class="s">"target"</span><span class="p">,</span> <span class="s">"Default"</span><span class="p">);</span>

<span class="nf">Task</span><span class="p">(</span><span class="s">"Default"</span><span class="p">)</span>
  <span class="p">.</span><span class="nf">Does</span><span class="p">(()</span> <span class="p">=&gt;</span>
  <span class="p">{</span>
    <span class="nf">Information</span><span class="p">(</span><span class="s">"Hello World!"</span><span class="p">);</span>
  <span class="p">});</span>

<span class="nf">RunTarget</span><span class="p">(</span><span class="n">target</span><span class="p">);</span>
</code></pre></div></div>
<p>Isn’t that more convenient than XML? And if your build files get bigger, you can split them up in several files and include them with the <code class="language-plaintext highlighter-rouge">#load file.cake</code> directive.</p>

<h1 id="bob-our-special-snowflake">Bob our special snowflake</h1>
<p>We have a build server with the same name as the guy with the motto “Yes we can”. No, not Obama. It’s Bob, Bob the builder! It is a Windows machine that runs Jenkins and several slave processes. It’s responsible for building the releases of our internally used software suite and for triggering the deployments. It also performs continuous and daily builds and gives feedback to developers. I really like Jenkins and I think it does what it does pretty well. I was quite happy working with it - yes, also for .NET projects. The reasons for switching to TFS shall not be part of this post.</p>

<figure class="image-float-right">
   <img src="/images/posts/2017-10-renew-your-builds-a-piece-of-cake/yes_we_can.png" title="Bob the builder - yes we can!" alt="Bob the builder - yes we can!" />
   <figcaption>Bob the builder - yes we can!</figcaption>
</figure>

<p>Because the build machine already has a few years on its back and has to build a lot of different projects the requirements to the installed software grew over time. Different frameworks, ui components, test tools, documentation generators, compiler versions code analysis tools are just a few among others. Each of which also have multiple versions available. This makes our “Bobby” a <a href="https://martinfowler.com/bliki/SnowflakeServer.html" target="_blank">very special snowflake</a>. And everyone that had to reproduce an error that just occurs on the build machine knows the pain something like this can cause.</p>

<p>Of course if we had treated the TFS environment the same way it would also be a mess, but we had the chance to create it from scratch. This means we could install some close to vanilla Windows machines with TFS build agents and the <a href="https://www.visualstudio.com/de/downloads/" target="_blank">Visual Studio 2017 build tools</a>. This is pretty much everything that is installed.</p>

<p>We still need a test runner, and all those other things that were previously installed on the build machine. So what are we going to do? Well, there is nothing that couldn’t be solved with cake. :) The built in support that Cake offers for handling tools and other dependencies is great for that. It uses NuGet packages so you can use every tool or library that is available via NuGet package within your build script. It also has very comfortable extension methods for the commonly used ones like NUnit, MsBuild and <a href="https://cakebuild.net/dsl/" target="_blank">many more</a>.</p>

<p>So what we do now instead of installing NUnit in several versions, we just specify the NUnit tool and its version in the projects build script like so and it is loaded and used by Cake.</p>

<div class="language-csharp highlighter-rouge"><div class="highlight"><pre class="highlight"><code><span class="err">#</span><span class="n">tool</span> <span class="s">"nuget:?package=NUnit.ConsoleRunner"</span>

<span class="nf">NUnit3</span><span class="p">(</span><span class="s">"./tests/**/*.Tests.dll"</span><span class="p">,</span> <span class="k">new</span> <span class="n">NUnit3Settings</span> <span class="p">{</span>
  <span class="n">NoResults</span> <span class="p">=</span> <span class="k">true</span>
  <span class="c1">// other settings</span>
<span class="p">});</span>
</code></pre></div></div>

<p>The same goes for static code analysis, code coverage, running database scripts, powershell and so on. There is a whole lot built in functionality. And if it’s not, there are …</p>

<h1 id="addins">Addins</h1>

<figure class="image-float-left">
   <img src="/images/posts/2017-10-renew-your-builds-a-piece-of-cake/cake-contrib.png" title="Cake contrib" alt="Cake contrib" />
   <figcaption>Cake contrib</figcaption>
</figure>

<p>If the need for a tool occurs that does not have built in C# wrappers for easier handling, chances are that somebody else needed that too and wrote an addin for it. There are already a lot of them available <a href="https://cakebuild.net/addins/" target="_blank">as you can see on the homepage</a>. If you can’t find it, there is always the chance to write your own addin. I wanted to run liquibase database migration scripts and created the <a href="https://github.com/papauorg/Cake.Liquibase" target="_blank">Cake.Liquibase addin</a>. It does not wrap all the functionality liquibase provides, but the part I needed, updating the database, is included. It allows defining the liquibase parameters by setting properties on a settings class and calling a method instead of having to deal with a batch file, the proper working directory, environment variables, escaping parmeters or quotes around paths. It’s just more comfortable to use the addin. And this is true for the most addins or tools.</p>

<p>Of course the addins and tools provided via NuGet are changed every now and then. To keep your build files stable you can use fixed versions of them by defining it in your build files.</p>

<div class="language-csharp highlighter-rouge"><div class="highlight"><pre class="highlight"><code><span class="err">#</span><span class="n">addin</span> <span class="s">"nuget:?package=Cake.AddinName&amp;version=1.0.0"</span>
</code></pre></div></div>

<p>This avoids broken builds because of incompatible updates of an addin. The same can be done for the Cake version itself. But there you have to specify the version in the <code class="language-plaintext highlighter-rouge">packages.config</code> within the <code class="language-plaintext highlighter-rouge">tools</code> folder with the usual NuGet xml sytax.</p>
<div class="language-xml highlighter-rouge"><div class="highlight"><pre class="highlight"><code><span class="cp">&lt;?xml version="1.0" encoding="utf-8"?&gt;</span>
<span class="nt">&lt;packages&gt;</span>
  <span class="nt">&lt;packages&gt;</span>
      <span class="nt">&lt;package</span> <span class="na">id=</span><span class="s">"Cake"</span> <span class="na">version=</span><span class="s">"0.21.1"</span> <span class="nt">/&gt;</span>
  <span class="nt">&lt;/packages&gt;</span>
<span class="nt">&lt;/packages&gt;</span>
</code></pre></div></div>
<p>Additionally, you can include other dependencies here. For example: I included the Liquibase.Cli package that contains the liquibase binaries here, so the Cake.Liquibase addin can use them and they do not need to be installed on the machine (also the addin supports installed versions, too). If you change the <code class="language-plaintext highlighter-rouge">packages.config</code> file keep in mind that you add it to your source control, but leave out the rest of the tools folder as those will get downloaded by the bootstrapper and do not need to be checked in. Also see the <a href="https://cakebuild.net/docs/tutorials/pinning-cake-version" target="_blank">Pinning Cake version</a> topic in the documentation.</p>

<h1 id="centralized-build-logic">Centralized build logic</h1>
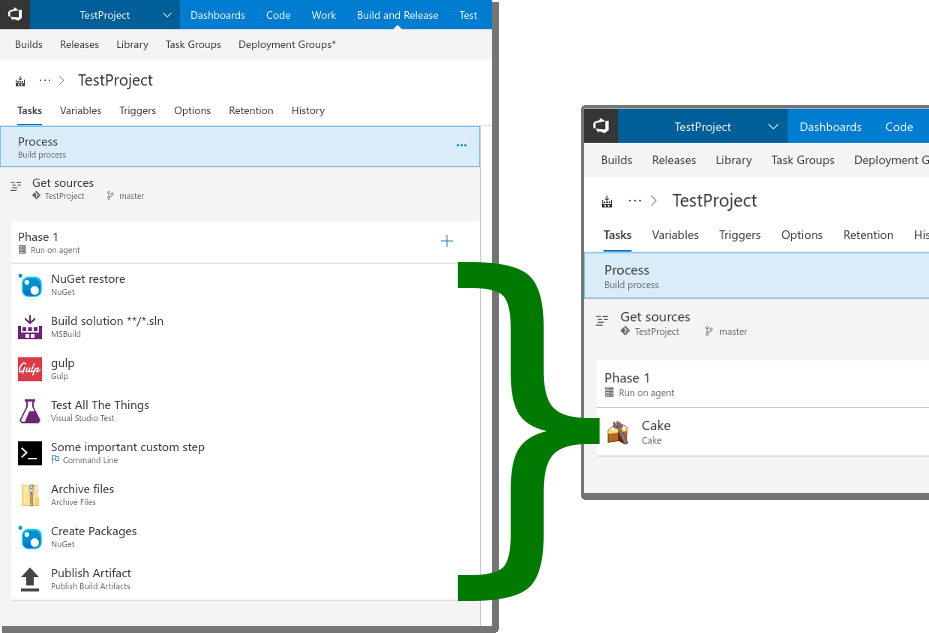
<p>In the past we had build files, too, but they didn’t contain the whole build process. They contained e.g. building the solution, but running tests or trying to run the database scripts were steps in the build server. This is working fine, but in my opinion has some disadvantages.</p>

<p>The first one is, if a step is only available on your build server and it fails, it is much harder to reproduce and fix it on a developer machine. If you keep all steps in the build file you can also execute them the same way they happen on the build machine. This can help a lot and speed up the time needed to fix build issues in many cases.</p>

<figure class="">
   <img src="/images/posts/2017-10-renew-your-builds-a-piece-of-cake/centralize_build_steps.png" title="Centralize build steps - before and after" alt="Centralize build steps - before and after" />
   <figcaption>Centralize build steps - before and after</figcaption>
</figure>

<p>Another disadvantage is that you have to change the build on the server in sync with the version of your source and build file. Why is that? Example incoming!</p>

<p>You want to switch your test framework because you like the shiny new release of <strong>SuperTest</strong> so much better than the old <strong>UsualTest</strong> that you currently use. Well, you go ahead and change all tests to use <strong>SuperTest</strong> and remove all references to <strong>UsualTest</strong>. You install the <strong>SuperTest</strong> runner on your machine, give it a try and commit because everything worked like a charm. Great right? No! Now, the pull request validation build fails because it’s still using that old school <strong>UsualTest</strong> runner. Damn. Good thing it’s only the pull request validation build, so just change the runner and be done with it! A few minutes later the colleague from the next room storms in and gives you a karate chop in the neck because his pull request was rejected due to failing tests. Similar problems occur for the continuous-, daily-, release- and other builds but only after your change is merged to the different branches. You see where I’m going with this.
You could create builds with different runners that build different branches depending on different build variables or something like that, but that makes the build environment very confusing. Also someone has to maintain those builds.</p>

<p>A better alternative, in my opinion, would be to keep this logic in the build file. So the build server just executes the script. The developer chooses the dependencies, tools and steps to be executed by editing the script and checking it in alongside with the code changes. All the build logic in one place and executable from the server or developer machine alike. This way the guy next door can still finish his pull request because his build file still uses the <strong>UsualTest</strong> runner. You can use the <strong>SuperTest</strong>s and its runner in your file. And when your branches get merged, the old tests are updated with your changes and the new runner gets introduced to the build file and you and your colleague live happily ever after. And so do the other builds.</p>

<p>I also sneaked in another goodie in the above example, you can have your build logic under source control with the obvious advantages. Big plus here!</p>

<h1 id="bootstrap">Bootstrap</h1>
<p>To use all the above mentioned advantages the developers must be able to use these scripts on their machines as well. This is very simple with Cake. It provides a powershell or bash script that handles all the bootstrapping. All a developer must do is execute that script. No installation of Cake is required. The script downloads the latest or in the packages.config specified version of Cake, your addins and tools and calls Cake afterwards. It’s really easy to get started.</p>

<h1 id="debugging">Debugging</h1>
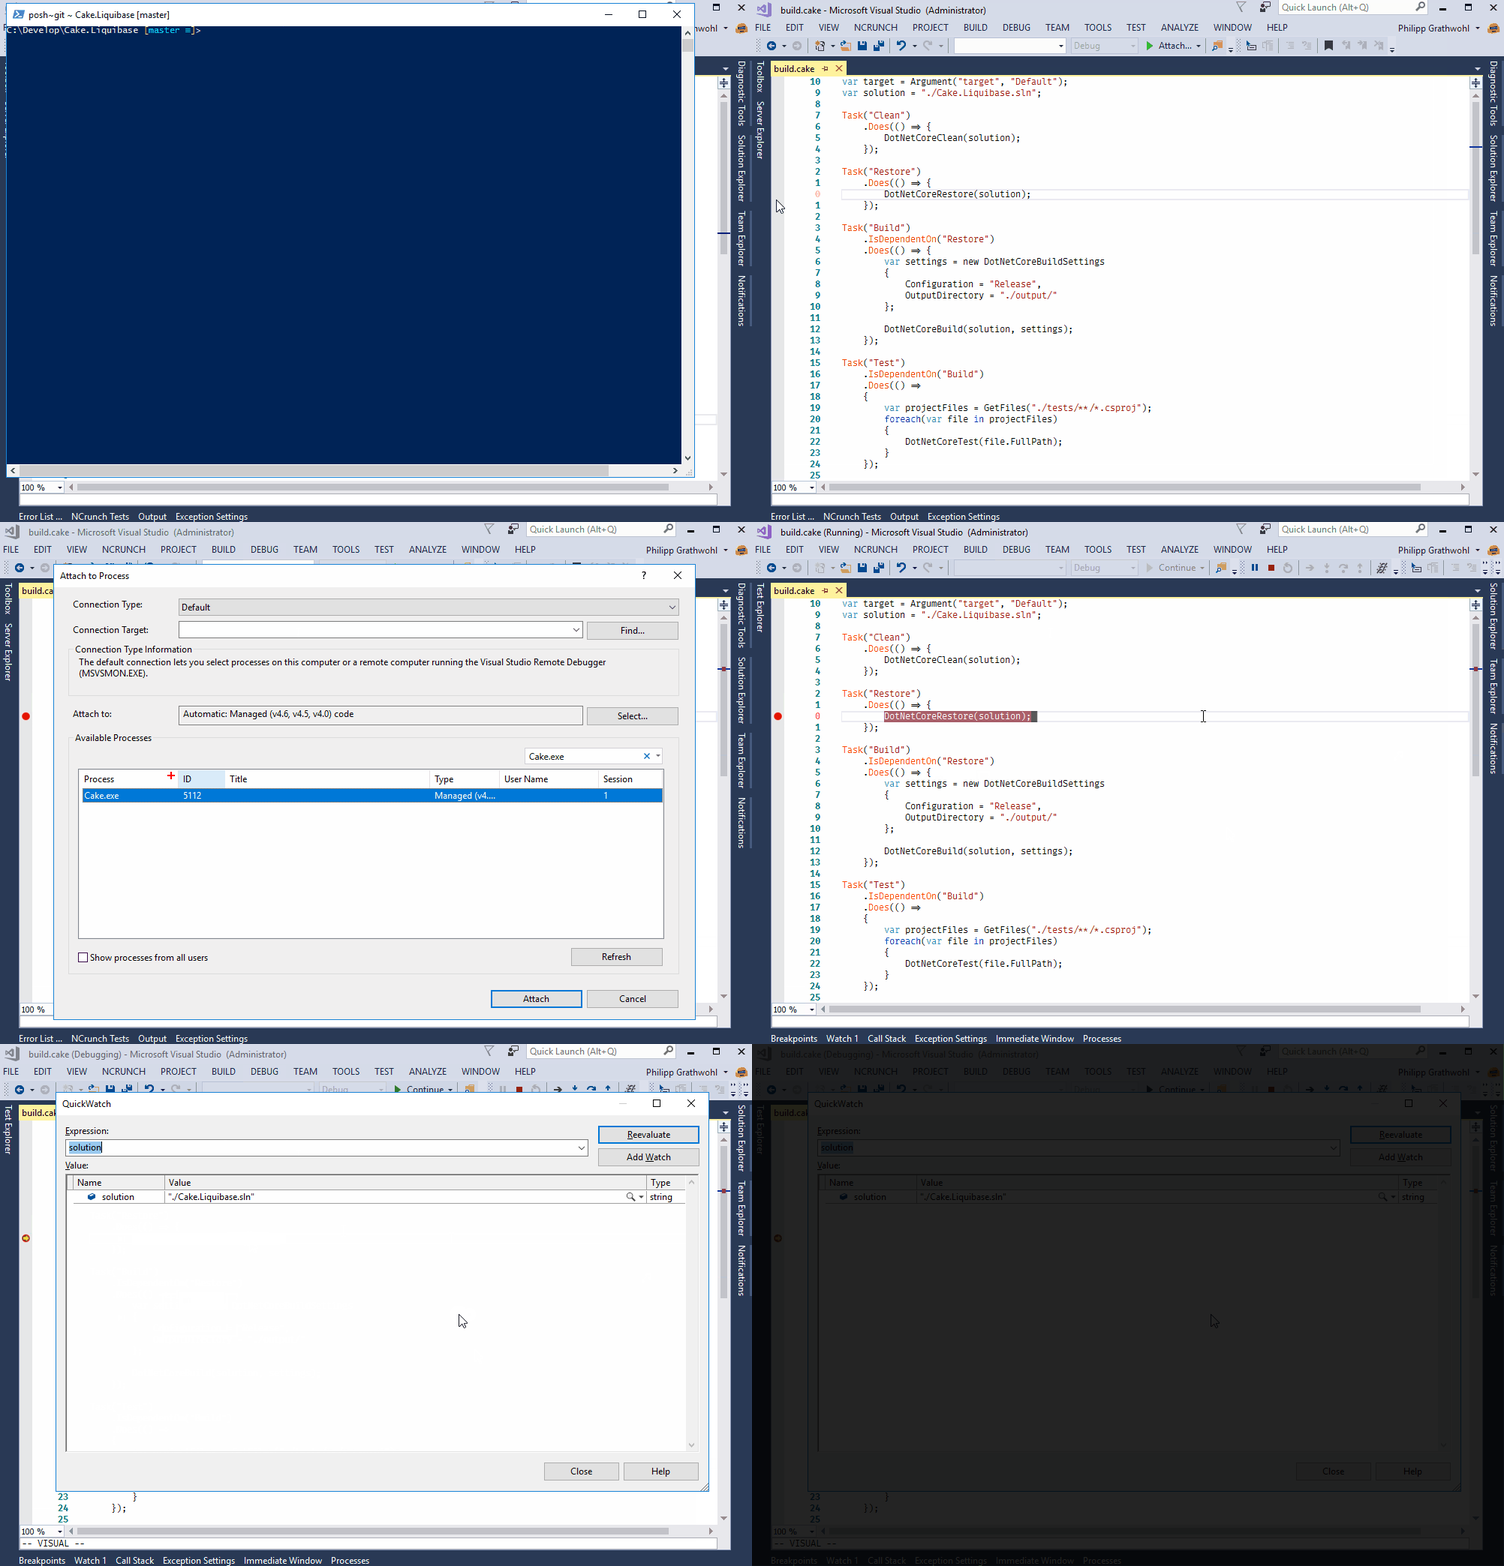
<p>As your build files get more complex you may need to find errors in it from time to time. Good news here: You can even debug your build scripts with Visual Studio. For this to work open the Cake script in Visual Studio. Pro-Tip: Install the Cake for Visual Studio extension first! Then start the Cake script with the <code class="language-plaintext highlighter-rouge">--debug</code> switch. Set a breakpoint and attach the debugger to the process Cake tells you.</p>

<figure class="">
   <img src="/images/posts/2017-10-renew-your-builds-a-piece-of-cake/Debug_Cake.gif" title="Debugging Cake scripts" alt="Debugging Cake scripts" />
   <figcaption>Debugging Cake scripts</figcaption>
</figure>

<p>This is really helpful and a fun thing to do! Try it!</p>

<h1 id="more-than-build">More than build</h1>
<p>Other than just handling builds we also use the script for other tasks. For example we regularly need to setup or recreate databases for our development environments. Instead of creating separate scripts and tools for that, we use Cake now. That’s why I created the Cake.Liquibase addin for. It’s just another target in the Cake script.</p>

<div class="language-powershell highlighter-rouge"><div class="highlight"><pre class="highlight"><code><span class="o">.</span><span class="n">\build.ps1</span><span class="w"> </span><span class="nt">--Target</span><span class="w"> </span><span class="nx">UpdateDatabase</span><span class="w">
</span></code></pre></div></div>
<p>That’s all there is to be done for it. You could automate all kinds of tasks to setup your development environment for a specific project. If it’s more complex you can also use arguments to specify details.</p>

<div class="language-powershell highlighter-rouge"><div class="highlight"><pre class="highlight"><code><span class="o">.</span><span class="n">\build.ps1</span><span class="w"> </span><span class="nt">--Target</span><span class="w"> </span><span class="nx">UpdateDatabase</span><span class="w"> </span><span class="nt">--databaseName</span><span class="o">=</span><span class="n">TestDatabase</span><span class="w"> </span><span class="nt">--otherParameters</span><span class="o">=</span><span class="n">y</span><span class="w">
</span></code></pre></div></div>
<p>The best thing is you can also document such tasks directly where they are used. Tasks in Cake can be documented with the <code class="language-plaintext highlighter-rouge">Description()</code> extension method and the <code class="language-plaintext highlighter-rouge">--showdescription</code> parameter displays all tasks with their descriptions.</p>

<div class="language-csharp highlighter-rouge"><div class="highlight"><pre class="highlight"><code><span class="nf">Task</span><span class="p">(</span><span class="s">"UpdateDatabase"</span><span class="p">)</span>
  <span class="p">.</span><span class="nf">Description</span><span class="p">(</span><span class="s">"Creates a new local development database ..."</span><span class="p">)</span>
  <span class="p">.</span><span class="nf">Does</span><span class="p">(()</span> <span class="p">=&gt;</span> <span class="p">{</span>
    <span class="c1">// code here</span>
  <span class="p">});</span>
</code></pre></div></div>
<p>gives you</p>

<div class="language-powershell highlighter-rouge"><div class="highlight"><pre class="highlight"><code><span class="err">&gt;</span><span class="w"> </span><span class="o">.</span><span class="n">\build.ps1</span><span class="w"> </span><span class="nt">--showdescription</span><span class="w">
</span><span class="n">Task</span><span class="w">                          </span><span class="nx">Description</span><span class="w">
</span><span class="o">================================================================================</span><span class="w">
</span><span class="n">UpdateDatabase</span><span class="w">                </span><span class="nx">Creates</span><span class="w"> </span><span class="nx">a</span><span class="w"> </span><span class="nx">new</span><span class="w"> </span><span class="nx">development</span><span class="w"> </span><span class="nx">database</span><span class="w"> </span><span class="nx">when</span><span class="w"> </span><span class="nx">necessary</span><span class="w">
                              </span><span class="n">and</span><span class="w"> </span><span class="nx">runs</span><span class="w"> </span><span class="nx">the</span><span class="w"> </span><span class="nx">database</span><span class="w"> </span><span class="nx">update</span><span class="w"> </span><span class="nx">scripts</span><span class="w"> </span><span class="nx">against</span><span class="w"> </span><span class="nx">it.</span><span class="w"> 
                              </span><span class="n">This</span><span class="w"> </span><span class="nx">gives</span><span class="w"> </span><span class="nx">you</span><span class="w"> </span><span class="nx">a</span><span class="w"> </span><span class="nx">clean</span><span class="w"> </span><span class="nx">and</span><span class="w"> </span><span class="nx">up</span><span class="w"> </span><span class="nx">to</span><span class="w"> </span><span class="nx">date</span><span class="w"> </span><span class="nx">database</span><span class="w"> 
                              </span><span class="n">to</span><span class="w"> </span><span class="nx">develop</span><span class="w"> </span><span class="nx">against.</span><span class="w">
</span><span class="n">Default</span><span class="w">                       
</span></code></pre></div></div>

<p>Unfortunately, there is not a built in way to <a href="https://github.com/cake-build/cake/issues/1708" target="_blank">document arguments</a> the same way as tasks at the time of writing. But because it’s .NET you can just use the available tools <a href="https://stackoverflow.com/questions/45413524/how-can-cake-build-arguments-be-documented" target="_blank">like described here</a> for that. That goes for any task you want to put in your script. Because it’s .NET the possibilities are nearly endless :P.</p>

<h1 id="conclusion">Conclusion</h1>
<p>Cake keeps our build servers clean, the dependencies are managed via NuGet, we can write C# instead of XML, we can write extensions so it fits our needs, we have an all-round tool for managing our projects and it is documented properly within the script. Any questions?</p>]]></content><author><name>Philipp Grathwohl</name></author><category term="build-automation" /><category term="development" /><category term="cake" /><category term=".net" /><summary type="html"><![CDATA[Bring your build environment up to date using the Cake (C# Make) build system and get a tool for handling your solutions on top.]]></summary><media:thumbnail xmlns:media="http://search.yahoo.com/mrss/" url="https://blog.papau.org/images/papauorg_logo.png" /><media:content medium="image" url="https://blog.papau.org/images/papauorg_logo.png" xmlns:media="http://search.yahoo.com/mrss/" /></entry><entry><title type="html">How I started my blog</title><link href="https://blog.papau.org/2017/10/10/how-i-started-my-blog.html" rel="alternate" type="text/html" title="How I started my blog" /><published>2017-10-10T00:00:00+00:00</published><updated>2017-10-10T00:00:00+00:00</updated><id>https://blog.papau.org/2017/10/10/how-i-started-my-blog</id><content type="html" xml:base="https://blog.papau.org/2017/10/10/how-i-started-my-blog.html"><![CDATA[<p>Many times I thought that I should start writing a blog. Nothing fancy, just about what techy problems I face and if and how I solved them. I just never started. Whether I was too lazy to set the thing up or didn’t think the topic was meaningful enough (good one, look at this post), there was always a reason not to do it. What do we say to the god of blogs? Yeah, you know what I mean.</p>

<p>But then sometimes all I need is a little push from somebody. In this case I watched the youtube video <a href="https://www.youtube.com/watch?v=-MUhcgXBj_A" target="_blank">‘Hack your career’ by Troy Hunt</a> which was really fun to watch. If you haven’t seen it, you should go watch it. But for me, after watching it, there was this feeling again:</p>

<p><img src="https://blog.papau.org/images/posts/2017-10-How-I-Started-My-Blog/ishouldstartablog.jpg" alt="I should start a blog" class="img-responsive center-image" /></p>

<h1 id="considerations">Considerations</h1>
<p>Before actually starting, a few questsions wanted answers. What do I want to write about and who would the target audience be? Well, as I said, I don’t plan to become the world’s most famous blogger or anything. So as I see it the target audience consists of mainly two groups:</p>

<ol>
  <li>Me</li>
  <li>People who googled something and coincidentally landed on this blog.</li>
</ol>

<p>I guess the first group will be the bigger one and so the main target audience am I. Damn, nothing to brag about, right? Well it’s fine. I will benefit from the writing itself. Maybe I can re-read or look-up something I described here and benefit from it again. You might ask: “Why don’t you just write it in your diary then?” And you are right, I could. But who knows, maybe my writing skills will increase over time and the topics will be more interesting - then somebody else might want to read it, too. You are reading this after all. And if nobody else is interested, so be it.</p>

<p>Essentially I just repeated the advice from Troy and every other blogger that ever wanted to convince someone to start a blog, let’s move on.</p>

<p>So where do we stand now? Mindset? Check! Target audience? Check! Topic to write the first blog post about? Nope, no idea. But hey, I want to write a blog post, I don’t have a blog: behold the glorious first ever blog post topic: How I started my blog! Pretty slick, huh?</p>

<p>The biggest obstacle up to now was always to get a blog of some kind up and running. Because of that I have a few requirements on my blog environment:</p>

<ol>
  <li>
    <p>It must be simple. I don’t want to waste my energy by investing billions (or more) of hours in learning how to use a blog. I want the first steps to be a quick success so I can motivate myself to keep updating and writing.</p>
  </li>
  <li>
    <p>There should be little to no maintenance required. I’ve installed WordPress before on my webspace that comes with my domain. I didn’t get to the point to actually write something because I got so involved in what plugins and themes and other stuff I should use that the most important part got lost. Also I don’t want to care about a database, backups, updates, php versions and all the stuff that comes with dynamic websites and blog engines.</p>
  </li>
  <li>
    <p>I’m from southern germany, upper swabia to be precise, and it’s a commonly used prejustice by my fellow countrymen that we are stingy. And as much as I disagree with that usually, in this case I have to admit that I do not want to spend money in addition to that what I’m paying for the my domain and webspace already. At least not as long as there are millions of thrilled groupie blog readers.</p>
  </li>
</ol>

<h1 id="jekyll">Jekyll</h1>
<p>Long story short, I remembered that I’ve somewhere heard about jekyll. Jekyll is a static site generator. You can write markdown files and it transforms it into a website or blog with static html pages. No database required. I didn’t even search for another one, I just started with that one. Why? Fulfills all the above mentioned requirements. Plus I wanted to try it anyway. Double Plus, you can use a github repository to host it and get it online via github pages with no effort at all. That means the whole maintenance thingy is gone. I won’t have to make a backup - I have the code hosted on github and one version checked out on my machine - that’s good enough for me. Github is taking care of the whole hosting stuff. And it’s completely free - as long as it is a public repository.</p>

<p>Hmm a public repository? Doesn’t that mean that all my secret blog stuff is going to be visible to all of you? Yes it does, but it does not matter. Why? Because it’s only static pages. No database user and password in any config files. No secret api-keys. No nothing. You can of course view the repository (and send a pull request to fix typos), but isn’t it more comfortable to view it nicely prepared on a regular blog-looking site?</p>

<p>There is one thing. Github does not allow to use plugins for jekyll on github pages - at least not if github is taking care of doing the site generation. This means I either have to generate the site myself and push the result to github or I can’t use plugins. If I find myself caring about that enough in the future I may switch the site to my own webspace. Until then I’m going to use the github pages.</p>

<p>Hmm .. after each paragraph I think I should start showing what I did to get this blog running, but every time there is something else I want to mention first. Enough with that now! What I did was the following.</p>

<h1 id="getting-started">Getting started</h1>
<p>In order to use jekyll you first need to install Ruby and RubyGems. That’s easy enough on a linux system and is described in detail on the <a href="https://jekyllrb.com/docs/installation/">jekyll installation guide</a>. Also then downloading and initializing the jekyll system is very easy and done via the command</p>

<div class="language-bash highlighter-rouge"><div class="highlight"><pre class="highlight"><code>gem <span class="nb">install </span>jekyll bundler
jekyll new papauorg-blog
</code></pre></div></div>
<p>where papauorg-blog is the name of the folder that gets created and the jekyll files get placed in. I created a new git repository in that same folder so I can experiment and try things without breaking anything along the way.</p>

<div class="language-bash highlighter-rouge"><div class="highlight"><pre class="highlight"><code>git init
git add <span class="nb">.</span>
git commit <span class="nt">-m</span> <span class="s2">"Create empty jekyll template"</span>
</code></pre></div></div>

<p>The jekyll bundler already added a .gitignore file that excludes the folder for the generated page as well as other cache and metadata directories.</p>

<h1 id="favicons">Favicons</h1>
<p>Next step which is of course one of the most important ones I can think of for the blog: I need to provide an awesome favicon. For this I went to the <a href="https://realfavicongenerator.net" target="_blank">RealFaviconGenerator</a> and generated a set of icons. Extracted the files in the root of the jekyll and made sure that the provided link and meta tags are included in the head of the page. For this I created the <code class="language-plaintext highlighter-rouge">head.html</code> file in the <code class="language-plaintext highlighter-rouge">_includes</code> folder and added the favicon link and meta tags. What this does is overwrite the head part of the theme you are using. In my case it was the minima theme. If you want the site to look like the theme even after you insert your links, you have to take care that the themes contents are also part of the newly created head.html page. To find out what has to be included find the <code class="language-plaintext highlighter-rouge">head.html</code> in the themes gem folder and put that content to your own <code class="language-plaintext highlighter-rouge">head.html</code>. To find the themes gem folder you can execute:</p>

<div class="language-bash highlighter-rouge"><div class="highlight"><pre class="highlight"><code><span class="c">#minima is the theme name</span>
bundle show minima 
<span class="c"># Returns the path --&gt; /var/lib/gems/2.3.0/gems/minima-2.1.1</span>
<span class="c"># look in the _includes folder</span>
</code></pre></div></div>

<p>Afterwards my head.html file looked like this:</p>

<div class="language-html highlighter-rouge"><div class="highlight"><pre class="highlight"><code><span class="nt">&lt;head&gt;</span>
  <span class="nt">&lt;meta</span> <span class="na">charset=</span><span class="s">"utf-8"</span><span class="nt">&gt;</span>
  <span class="nt">&lt;meta</span> <span class="na">http-equiv=</span><span class="s">"X-UA-Compatible"</span> <span class="na">content=</span><span class="s">"IE=edge"</span><span class="nt">&gt;</span>
  <span class="nt">&lt;meta</span> <span class="na">name=</span><span class="s">"viewport"</span> <span class="na">content=</span><span class="s">"width=device-width, initial-scale=1"</span><span class="nt">&gt;</span>

  <span class="nt">&lt;title&gt;</span>{% if page.title %}{{ page.title | escape }}{% else %}{{ site.title | escape }}{% endif %}<span class="nt">&lt;/title&gt;</span>
  <span class="nt">&lt;meta</span> <span class="na">name=</span><span class="s">"description"</span> <span class="na">content=</span><span class="s">"{{ page.excerpt | default: site.description | strip_html | normalize_whitespace | truncate: 160 | escape }}"</span><span class="nt">&gt;</span>

  <span class="nt">&lt;link</span> <span class="na">rel=</span><span class="s">"stylesheet"</span> <span class="na">href=</span><span class="s">"{{ "</span><span class="err">/</span><span class="na">assets</span><span class="err">/</span><span class="na">main.css</span><span class="err">"</span> <span class="err">|</span> <span class="na">relative_url</span> <span class="err">}}"</span><span class="nt">&gt;</span>
  <span class="nt">&lt;link</span> <span class="na">rel=</span><span class="s">"canonical"</span> <span class="na">href=</span><span class="s">"{{ page.url | replace:'index.html','' | absolute_url }}"</span><span class="nt">&gt;</span>
  <span class="nt">&lt;link</span> <span class="na">rel=</span><span class="s">"alternate"</span> <span class="na">type=</span><span class="s">"application/rss+xml"</span> <span class="na">title=</span><span class="s">"{{ site.title | escape }}"</span> <span class="na">href=</span><span class="s">"{{ "</span><span class="err">/</span><span class="na">feed.xml</span><span class="err">"</span> <span class="err">|</span> <span class="na">relative_url</span> <span class="err">}}"</span><span class="nt">&gt;</span>
  
  {% if jekyll.environment == 'production' and site.google_analytics %}
  {% include google-analytics.html %}
  {% endif %}

  <span class="c">&lt;!-- favicons --&gt;</span>
  <span class="nt">&lt;link</span> <span class="na">rel=</span><span class="s">"apple-touch-icon"</span> <span class="na">sizes=</span><span class="s">"180x180"</span> <span class="na">href=</span><span class="s">"/images/favicons/apple-touch-icon.png"</span><span class="nt">&gt;</span>
  <span class="nt">&lt;link</span> <span class="na">rel=</span><span class="s">"icon"</span> <span class="na">type=</span><span class="s">"image/png"</span> <span class="na">sizes=</span><span class="s">"32x32"</span> <span class="na">href=</span><span class="s">"/images/favicons/favicon-32x32.png"</span><span class="nt">&gt;</span>
  <span class="nt">&lt;link</span> <span class="na">rel=</span><span class="s">"icon"</span> <span class="na">type=</span><span class="s">"image/png"</span> <span class="na">sizes=</span><span class="s">"16x16"</span> <span class="na">href=</span><span class="s">"/images/favicons/favicon-16x16.png"</span><span class="nt">&gt;</span>
  <span class="nt">&lt;link</span> <span class="na">rel=</span><span class="s">"manifest"</span> <span class="na">href=</span><span class="s">"/images/favicons/manifest.json"</span><span class="nt">&gt;</span>
  <span class="nt">&lt;link</span> <span class="na">rel=</span><span class="s">"mask-icon"</span> <span class="na">href=</span><span class="s">"/images/favicons/safari-pinned-tab.svg"</span> <span class="na">color=</span><span class="s">"#5bbad5"</span><span class="nt">&gt;</span>
  <span class="nt">&lt;link</span> <span class="na">rel=</span><span class="s">"shortcut icon"</span> <span class="na">href=</span><span class="s">"/images/favicons/favicon.ico"</span><span class="nt">&gt;</span>
  <span class="nt">&lt;meta</span> <span class="na">name=</span><span class="s">"msapplication-config"</span> <span class="na">content=</span><span class="s">"/images/favicons/browserconfig.xml"</span><span class="nt">&gt;</span>
  <span class="nt">&lt;meta</span> <span class="na">name=</span><span class="s">"theme-color"</span> <span class="na">content=</span><span class="s">"#ffffff"</span><span class="nt">&gt;</span>
<span class="nt">&lt;/head&gt;</span>
</code></pre></div></div>
<p>As you can see I chose to put the favicons and config files of the generator under a sub directory images/favicons to keep the root level tidy. Jekyll copies files and folders that do not have a specified meaning for jekyll to the generated site so the favicons will be available there. Now commit that change and if I want to bookmark my own blog on different devices I get beautiful favicons now. 
Time for a first check. Execute</p>
<div class="language-bash highlighter-rouge"><div class="highlight"><pre class="highlight"><code>jekyll serve
</code></pre></div></div>
<p><img src="https://blog.papau.org/images/posts/2017-10-How-I-Started-My-Blog/browserwithfavicon.png" alt="Browser with working favicon" class="image-float-right" />
and visit http://localhost:4000 and view your empty blog with awesome favicon.</p>
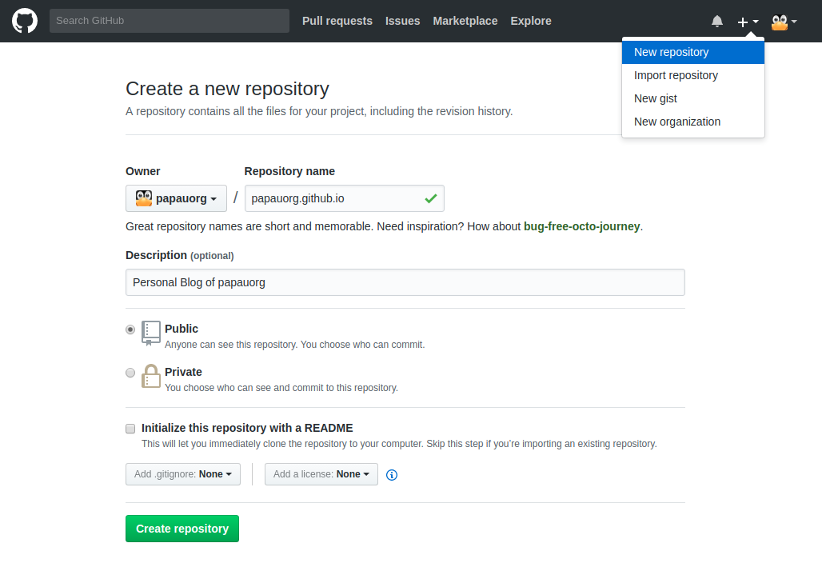
<h1 id="some-love-for-search-engines">Some love for search engines</h1>
<p>For the second target audience, the random googlers, to find this page, a little more information on the page is helpful. I don’t really know much about search engine optimization but if I can boost the ranking by nothing more than installing a plugin then I’ll give it a try. The plugin is called <code class="language-plaintext highlighter-rouge">jekyll-seo-tag</code> and it’s also supported on github pages. The installation is simple and it adds a few tags to the pages that are used by search engines.</p>

<p>Add the plugin to the <code class="language-plaintext highlighter-rouge">_config.yml</code>, install it via <code class="language-plaintext highlighter-rouge">gem install jekyll-seo-tag</code> and add it to the <code class="language-plaintext highlighter-rouge">Gemfile</code> <a href="https://jekyllrb.com/docs/plugins/" target="_blank">as described in the docs.</a></p>

<p>After that <a href="https://github.com/jekyll/jekyll-seo-tag/blob/master/docs/usage.md" target="_blank">fill the information</a> in the <code class="language-plaintext highlighter-rouge">_config.yml</code> and include a <code class="language-plaintext highlighter-rouge">{% seo %}</code> in your custom <code class="language-plaintext highlighter-rouge">_includes/head.html</code> file for the tags to be included in your pages. After doing that some tags like <code class="language-plaintext highlighter-rouge">&lt;title&gt;</code> were in the pages twice. I removed these from my <code class="language-plaintext highlighter-rouge">head.html</code> file and used the ones coming from the plugin instead.</p>

<h1 id="github-pages">Github pages</h1>
<p>As described earlier I will use github pages for hosting this blog. At least until I feel the need to move somewhere else. To get started, the first step is to go to github and create a new repository named <em>yourgithubusername.github.io</em> so in my case: <code class="language-plaintext highlighter-rouge">papauorg.github.io</code>. <img src="https://blog.papau.org/images/posts/2017-10-How-I-Started-My-Blog/newrepository.png" alt="Create new Github repository" /></p>

<p>Awesome. Now follow the instructions in the overview to add the remote to your local git repository and push it up to github.</p>

<div class="language-bash highlighter-rouge"><div class="highlight"><pre class="highlight"><code>git remote add origin git@github.com:youruser/youruser.github.io.git
git push <span class="nt">-u</span> origin master
</code></pre></div></div>

<p>That’s it! Now my very first blog is hosted under https://papauorg.github.io. If you see an 404 error on your github page, then maybe you need more patience. The first page build can take a while. If it’s still not there after a few minutes, take a look at the <a href="https://help.github.com/articles/troubleshooting-github-pages-builds/">troubleshooting guide</a>. In my case I requested my page before pushing first and the 404 page was cached. Disabling the browser cache didn’t help, because it was cached by a cache server of github. A little trick helped me to view the page the first time, I just called <code class="language-plaintext highlighter-rouge">https://papauorg.github.io?some=queryparam</code> to trick the cache server to load the page from the built source and making sure the page works. Later I pushed a new commit to the page and found out that this solved the caching problem and I could use the regular URL.</p>

<p>Github pages are available over a secure connection (https) which is pretty cool and all, but I really want to use my own domain for my blog. Custom domains are supported by github, but as far as I can tell it’s not possible to have a secure connection with custom domains. That is slightly annoying but nothing we couldn’t fix.</p>

<h1 id="cloudflare">Cloudflare</h1>
<p>Cloudflare to the rescue! Cloudflare is a service, that can be placed before your website. It can handle the SSL/TLS certificates for your domains, provides DDOS protection and other useful tools that I’m not going to describe here. I just want my domain + TLS for my blog. For this I did the following steps:</p>

<ol>
  <li>Create a new Cloudflare account</li>
  <li>Let Cloudflare scan your domain and overtake the DNS records. It guides you through this process when you first login.</li>
  <li>Change the DNS Server that should be responsible for your domain to the ones Cloudflare suggests. In my case I had to login to my current provider and change the nameservers via the web administration interface.</li>
  <li>Create a CNAME DNS record e.g. <code class="language-plaintext highlighter-rouge">blog.papau.org</code> that points to <code class="language-plaintext highlighter-rouge">papauorg.github.io</code> in the cloudflare DNS settings</li>
  <li>Add a custom domain for your github page by clicking the <code class="language-plaintext highlighter-rouge">Settings</code> button while in the <code class="language-plaintext highlighter-rouge">youruser/youruser.github.io</code> repository.</li>
  <li>If not already the case activate the <code class="language-plaintext highlighter-rouge">Always use HTTPS</code> setting in cloudflare.</li>
</ol>

<p>I had to wait a few minutes for the changes to take effect, but then I got this amazing view:<img src="https://blog.papau.org/images/posts/2017-10-How-I-Started-My-Blog/securepapau.png" alt="Secured papau.org blog" /></p>

<h1 id="content">Content</h1>
<p>So now there is only one thing left to do. Add some content. And nothing is simpler than that, just copy all of this blog post, format it in markdown and create a new 2017-10-10-how-i-started-my-blog.md in the _posts folder in jekyll. Commit, push and visit the page. PROFIT!</p>

<h1 id="conclusion">Conclusion</h1>
<p>I finally started my blog with markdown, jekyll and the tool developers know and love - git. It took me a while to write this post and get it online, but I’m sure it can be done faster. But I really love to take long breaks - a lot of them. :) I’m glad that the first step is done and hope I keep updating this thing. Well, we’ll see …</p>]]></content><author><name>Philipp Grathwohl</name></author><summary type="html"><![CDATA[How and why I started my first blog using jekyll, github pages and cloudflare.]]></summary><media:thumbnail xmlns:media="http://search.yahoo.com/mrss/" url="https://blog.papau.org/images/papauorg_logo.png" /><media:content medium="image" url="https://blog.papau.org/images/papauorg_logo.png" xmlns:media="http://search.yahoo.com/mrss/" /></entry></feed>